NodeMCU on ESP8285 is a perfect match as I found out last night. Yes, you got that right NodeMCU on ESP8285 not ESP8266.
In this post I’ll talk a little bit about Espressif’s new ESP8285, about a development board with that SoC and give you instructions how to run the NodeMCU firmware on it. It just so happens that only two days ago hackaday.com published a lurid article about the ESP8285.
ESP8285
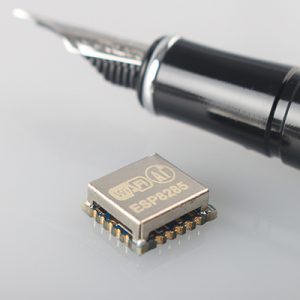
ESP8285 is the ESP8266 chip embedded with 1MB flash memory specially designed for wearable devices. It was announced by Espressif on March 9th 2016. I later realized that the announcement was made when the actually started mass production of the SoC.
I’ll give you a quick run-down of the specs just below, it really is very similar to the ESP8266. For more details check the ESP8285 datasheet.
CPU
ESP8285 integrates a Tensilica L106 32-bit micro controller (MCU) and ultra-low-power 16- bit RISC. The CPU clock speed is 80 MHz but it could run at 160 MHz max.
Memory
ESP8285 integrates a memory controller and memory units including SRAM and ROM. There is no programmable ROM in the SoC, therefore, user programs must be stored in a SPI flash.
Flash
ESP8285 has a built-in 1MB SPI flash to store user programs. SPI mode: Dual Out (DOUT).
WiFi
- 802.11 b/g/n/e/i support.
- WiFi Direct (P2P) support.
- P2P Discovery, P2P Group Owner mode, P2P Power Management.
- Infrastructure BSS Station mode / P2P mode / softAP mode support.
- WPA/WPA2 PSK, and WPS driver.
ESP8285 development board
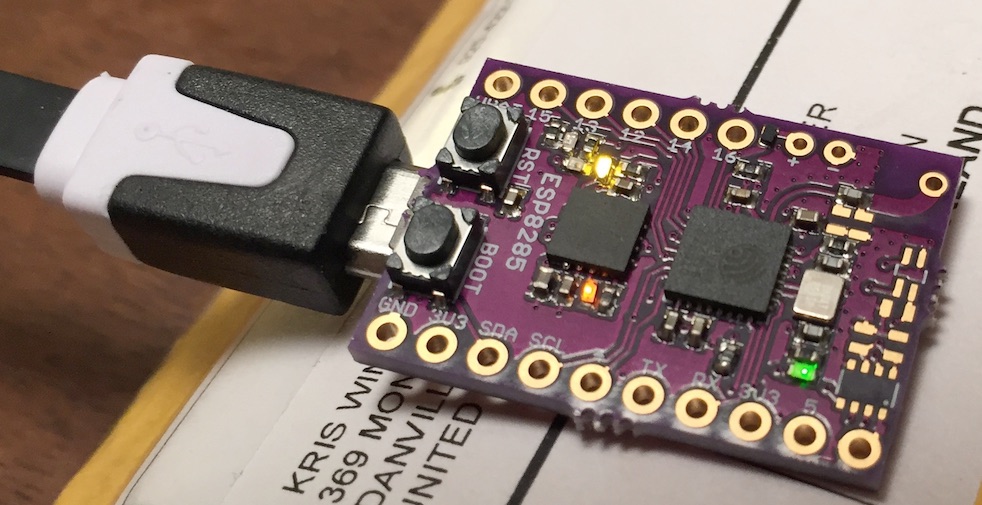
Ever since Espressif’s announcement in March I’ve been checking the usual outlets like AliExpress and Banggood for that chip. They still haven’t surfaced there but roughly two weeks ago I found an even better offer: a ESP8285 development board on Tindie.
Just as the SoC itself the board is tiny, 0.7 x 1 inch or 1.8 x 2.54 cm. And it’s a real beauty, isn’t it. I will definitely need to add it to my comparison of NodeMCU development boards.
Features
- FTDI FT230X USB-to-serial converter (USB Micro-B connector)
- MAX1555 LiPo battery charger
- reset and boot buttons for easy programming
- 5 LEDs
- through-hole at the end of the antenna trace for a 1.25 inch long copper wire
LEDs
I don’t know the purpose and possible states (solid, blinking, etc.) of all the LEDs yet.
| LED | Purpose | States |
|---|---|---|
| Blue | GPIO 15 | |
| Green | power on | |
| Red | charging indication | |
| Yellow | RX | on = data transmission |
| Orange | TX | on = data transmission |
Availability
This ESP8285 development board is produced by Kris Winer from Pesky Products. It’s currently the only one of its kind to my knowledge. Since it’s hand-made in small batches the price is pretty steep: $24.95 plus shipping. However, Kris states that
I have placed an order with a fab in China for 100…
and
My hope is that this board will prove popular enough to have a small production run made, in which case the price could come down considerably.
NodeMCU on ESP8285
I got a board from Kris with the intention to see if I could just run a standard NodeMCU firmware on it. He told me that he uses them with Arduino exclusively as he had struggled with NodeMCU in the past.
So, I plugged it in and immediately the blue LED started blinking like crazy and very brightly so. This made me suspicious and I wasn’t surprised when my initial flashing attempts failed. The flasher failed to establish a connection to the device. Then I remembered that before I started using NodeMCU dev kits or WeMOS D1 mini modules there was a time when the ESP8266 had to be put into flash mode manually. From then on it was all smooth sailin’.
How to flash NodeMCU to ESP8285
You need to pay attention to three things: put the device into flash mode, use SPI mode DOUT rather than DIO, define flash size 1MB i.e. 8Mbit. I use esptool to flash as suggested in the NodeMCU documentation.
- Press + hold the BOOT button and plug the device in, or push the RST (reset) button if already connected.
- Run the following command in your esptool directory:
esptool.py --port <serial-port> write_flash -fm dout -fs 8m 0x00000 <NodeMCU firmware>
Use NodeMCU on ESP8285
This chapter intentionally left blank….seriously, from here on it’s just like using NodeMCU on the ESP8266. Opening serial communication with ESPlorer, connecting to WiFi access point, running other Lua code – absolutely no difference.
Update 2017-03-07
WeMos sells a D1 mini version that hosts a ESP8285 for $3.
please view this new ESP8285 board https://www.itead.cc/psf-a85.html
I ordered a few the other day but demand seems to be so high it might take a while until they’re shipped.
OSH Park has a simple breakout board for the PSF-A85. [ PSF-A85v1.brd ]
https://oshpark.com/shared_projects/RtlcoCvl
Thanks Marvin for the link. It would have been nice if you had disclosed that it’s you who’s selling that board.
What is the advantage of this board over the one I reviewed? At first sight I don’t see any. No USB connector, no LiPo connector and I still need to solder those tiny 1/20” connectors to the board – a challenge to anyone who doesn’t work with such devices every day.
The itead PSF-A85 modules work just the same as described here. They work with unmodified NodeMCU firmware. I just replaced a ESP-01 based mobile sensor with this, getting deepsleep current down to less than 25µA from 45+µA with ESP-01 (and ESP-12E, btw.).
Indeed, very nice – once you get the wiring right.
Is there any tutorial on how to program it with Arduino IDE?
I’ve downloaded ESP8266 module add-on to my Arduino IDE 1.6.9 and I can see ESP8285 module in the board selection. But when I tried to flash Blink app to it, it failed with message
“warning: espcomm_sync failed”
“error: espcomm_open failed”
“error: espcomm_upload_mem failed”
What am I missing? Actually I am not sure what programmer I should use? I tried all the programmers available in IDE. None of them works.
I don’t have any information other than what’s already documented on the seller’s Tindie page at https://www.tindie.com/products/onehorse/esp8285-development-board/.