This guide shows you how to deploy artifacts to Maven Central with the help of Sonatype OSSRH (OSS Repository Hosting). It only takes few simple steps to release to Maven Central – if you follow the right tutorial.
Brief intro
![]() In January 2010 Maven Central stopped accepting rsync feeds from projects into their repository. It was an approach that just didn’t scale. See the official Maven Central documentation for details. In order to release to Maven Central your project either needs to be in an approved repository hosting location such as Apache or Codehaus or you need to publish to Sonatype OSSRH instead. Sonatype acts as an intermediary itself being an approved repository hosting location.
In January 2010 Maven Central stopped accepting rsync feeds from projects into their repository. It was an approach that just didn’t scale. See the official Maven Central documentation for details. In order to release to Maven Central your project either needs to be in an approved repository hosting location such as Apache or Codehaus or you need to publish to Sonatype OSSRH instead. Sonatype acts as an intermediary itself being an approved repository hosting location.
Why this guide
There’s extensive documentation by Sonatype about the whole process. However, at the end of March 2014 their documentation was completely overhauled. While being well written and easy to follow there are two problems with it:
- Not streamlined enough. It’s covers a lot of ground and talks about many possible build scenarios. It can be difficult to understand which sections actually apply to you.
- The old documentation wasn’t retired. The new docs link to the old ones for certain steps. This leads to inconsistencies and cost me a few hours because the old docs are just wrong sometimes i.e. their instructions don’t fit the current process anymore.
I’m going to show you how to configure your Mac and your pom.xml in order to do a plain Maven release and release to Maven Central. Where applicable I’ll reference the Sonatype docs of course. Let’s go!
Outline
I’ll walk you through the below tasks:
- Sign up with Sonatype and request a new project
- Include required meta data in POM
- Sign artifacts with GPG/PGP
- Configure build plugins in POM
- Deploy release builds to Sonatype OSSRH
- Release to Maven Central from Sonatype OSSRH
Request new project with Sonatype
Sonatype uses JIRA to manage requests.
- Create your JIRA account if you don’t have one yet
- Create a New Project ticket
This triggers the creation of your repositories at Sonatype. Normally, the process takes less than 2 business days (last time it took <10min). In the meantime you can complete all other tasks.
Include required meta data in POM
Maven Central mandates that you provide sufficient meta data. Sonatype will verify this and publishing will fail if your POM is not compliant. Read up on the details or copy/paste from the below bare minimal template:
<groupId>com.github.valdr</groupId>
<artifactId>valdr-bean-validation-parent</artifactId>
<version>1.0.1-SNAPSHOT</version>

<name>valdr Bean Validation</name>
<description>Bean Validation (JSR 303/349) plugin for valdr, the new AngularJS Model Validator.</description>
<url>https://github.com/netceteragroup/valdr-bean-validation</url>

<licenses>
  <license>
    <name>MIT License</name>
    <url>http://www.opensource.org/licenses/mit-license.php</url>
  </license>
</licenses>

<developers>
  <developer>
    <name>Marcel Stör</name>
    <email>my first name @ my TLD</email>
    <url>http://frightanic.com</url>
    <timezone>+1</timezone>
    <roles>
      <role>developer</role>
    </roles>
  </developer>
</developers>

<scm>
  <url>https://github.com/netceteragroup/valdr-bean-validation</url>
  <connection>scm:git:git@github.com:netceteragroup/valdr-bean-validation.git</connection>
  <developerConnection>scm:git:git@github.com:netceteragroup/valdr-bean-validation.git</developerConnection>
  <tag>HEAD</tag>
</scm>
There’s also an example POM in the Sonatype docs.
Sign artifacts with GPG/PGP
 Setting up artifact signing correctly was the only major obstacle for me the first time. It was all new to me and the Sonatype docs are not correct in certain areas. If you work with Windows or Linux the old Sonatype documentation on GPG/PGP may be ok. I couldn’t tell because I work on a Mac which makes everything a lot easier – as I know now. I’ll describe how to prepare OS X for GPG below. The integration in the POM is documented in the next chapter.
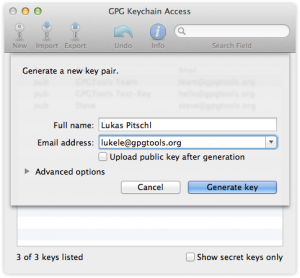
- Download and install the GPG Suite
- Generate a new key according to the docs on the GPG site
- Publish your key to a key server.
Both generating and publishing are a breeze, the GPG Suite is fantastic!
Configure build plugins in POM
The Sonatype page on deployment with Maven has a wealth of information but it left me puzzled. I didn’t quite know what was actually applicable for me and what not. Again you may optionally read up on the details on the Sonatype page. However, I reckon it’s easier if you copy/paste from my fully functional POM. The relevant section is below:
      <plugin>
        <groupId>org.apache.maven.plugins</groupId>
        <artifactId>maven-release-plugin</artifactId>
        <configuration>
          <autoVersionSubmodules>true</autoVersionSubmodules>
          <useReleaseProfile>false</useReleaseProfile>
          <!-- references the profile defined just below -->
          <releaseProfiles>release</releaseProfiles>
          <goals>deploy</goals>
        </configuration>
      </plugin>
    </plugins>
  </build>

  <profiles>
    <!-- all plugins below are usually only required for release builds -->
    <profile>
      <id>release</id>
      <build>
        <plugins>
          <plugin>
            <groupId>org.apache.maven.plugins</groupId>
            <artifactId>maven-source-plugin</artifactId>
            <executions>
              <execution>
                <id>attach-sources</id>
                <goals>
                  <goal>jar-no-fork</goal>
                </goals>
              </execution>
            </executions>
          </plugin>
          <plugin>
            <groupId>org.apache.maven.plugins</groupId>
            <artifactId>maven-javadoc-plugin</artifactId>
            <executions>
              <execution>
                <id>attach-javadocs</id>
                <goals>
                  <goal>jar</goal>
                </goals>
              </execution>
            </executions>
          </plugin>
          <plugin>
            <groupId>org.apache.maven.plugins</groupId>
            <artifactId>maven-gpg-plugin</artifactId>
            <executions>
              <execution>
                <id>sign-artifacts</id>
                <phase>verify</phase>
                <goals>
                  <goal>sign</goal>
                </goals>
              </execution>
            </executions>
          </plugin>
        </plugins>
      </build>
    </profile>
  </profiles>
</project>
Note. if you work on a Mac no further configuration for the maven-gpg-plugin is required, neither in the POM nor in the settings.xml. It all just works out-of-the-box with the GPG Suite if you only generated a single key.
Deploy release builds to Sonatype OSSRH
In order to tell Maven where to deploy your artifacts to during a release build you need to add a distribution management section.
<distributionManagement>
  <snapshotRepository>
    <id>ossrh</id>
    <name>Maven Central Snapshot Repository</name>
    <url>https://oss.sonatype.org/content/repositories/snapshots</url>
  </snapshotRepository>
  <repository>
    <id>ossrh</id>
    <name>Maven Central Staging Repository</name>
    <url>https://oss.sonatype.org/service/local/staging/deploy/maven2/</url>
  </repository>
</distributionManagement>
Both listed Sonatype repositories require authentication. Hence, your credentials for the server need to be added to your personal Maven settings.xml file in ~/.m2.
<servers>
  ...
  <server>
    <id>ossrh</id>
    <username>your-Sonatype-JIRA-username</username>
    <password>your-Sonatype-JIRA-password</password>
  </server>
</servers>
Puuhh, finally, all the tedious preparations are done! If you now run a regular Maven release build all artifacts will be created, signed, and deployed to Sonatype.
mvn release:clean release:prepare

mvn release:perform
Release to Maven Central
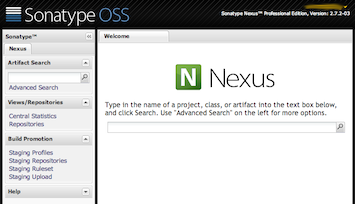 All that is left to do at this point is to login to the OSSRH Nexus, make a few clicks and sit back. Sonatype will release to Maven Central what you just deployed within a few minutes. This part is again nicely documented in the Sonatype guide.
If you want to automate this last step as well, I recommend you do, then you need to add the Nexus Staging Maven Plugin to the release profile in the POM like so:
<profiles>
  <profile>
    <id>release</id>
    <build>
      <plugins>
        <!-- other plugins like source, javadoc and gpg go here -->
        <plugin>
          <groupId>org.sonatype.plugins</groupId>
          <artifactId>nexus-staging-maven-plugin</artifactId>
          <extensions>true</extensions>
          <configuration>
            <serverId>ossrh</serverId>
            <nexusUrl>https://oss.sonatype.org/</nexusUrl>
            <autoReleaseAfterClose>true</autoReleaseAfterClose>
          </configuration>
        </plugin>
      </plugins>
    </build>
  </profile>
</profiles>
This automatically replaces the deploy goal invocation of the Maven deploy plugin in the deploy Maven life cycle phase with the deploy goal invocation of the Nexus staging Maven plugin. It will release and close your staging repository on Nexus during the execution of mvn release:perform.
Summary
Based on my own POM which may serve as a reference I guided you step-by-step to release to Maven Central. I hope I was able to demonstrate that once GPG is correctly configured on your system it’s really just a matter of pasting the right chunks of configuration into your POM.
Let me know how well this guide worked for you.