A while ago I asked on Stack Overflow how to create an info icon with wxPython. I asked because I needed a way to to explain the options for a radio control in my NodeMCU PyFlasher project. Ultimately the idea was to redirect users to two online resources that explain those options in much greater detail than a tooltip can. Therefore, I had planned to display URL-shortened “links” in the tooltip. Then users would select & copy the link and paste it into their browser.
The answers to my Stack Overflow question were quite interesting and “authoritative” as they came from wxPython committers and experts. When I started experimenting with the various approaches I also noticed another problem. Unfortunately it doesn’t seem possible to select & copy text in the tooltip “window”. Eventually this lead to a second SO question a few days later.
Then it dawned on my that I could do much better. How about using HTML with clickable hyperlinks in the tooltip? Earlier I had used the wxPython HtmlWindow for that in the About-dialog for the same application.
Create an info icon with wxPython
To create an info icon with wxPython in my case now consists of two components: the HTML-enabled tooltip window and a button/icon to trigger it.
HTML tooltip window
For the custom tooltip window I borrowed (i.e. extended) from the TransientPopupWindow. Contrary to the base class my implementation allows to set three additional parameters in the constructor:
- markup for the HTML
<body> - window size
- background color
This file contains bidirectional Unicode text that may be interpreted or compiled differently than what appears below. To review, open the file in an editor that reveals hidden Unicode characters.
Learn more about bidirectional Unicode characters
| # coding=utf-8 | |
| import wx | |
| import wx.html | |
| import webbrowser | |
| class HtmlPopupTransientWindow(wx.PopupTransientWindow): | |
| def __init__(self, parent, style, html_body_content, bgcolor, size): | |
| wx.PopupTransientWindow.__init__(self, parent, style) | |
| panel = wx.Panel(self) | |
| panel.SetBackgroundColour(bgcolor) | |
| html_window = self.HtmlWindow(panel, wx.ID_ANY, size=size) | |
| html_window.SetPage('<body bgcolor="' + bgcolor + '">' + html_body_content + '</body>') | |
| sizer = wx.BoxSizer(wx.VERTICAL) | |
| sizer.Add(html_window, 0, wx.ALL, 5) | |
| panel.SetSizer(sizer) | |
| sizer.Fit(panel) | |
| sizer.Fit(self) | |
| self.Layout() | |
| class HtmlWindow(wx.html.HtmlWindow): | |
| def OnLinkClicked(self, link): | |
| # get a hold of the PopupTransientWindow to close it | |
| self.GetParent().GetParent().Dismiss() | |
| webbrowser.open(link.GetHref()) |
Triggering the tooltip
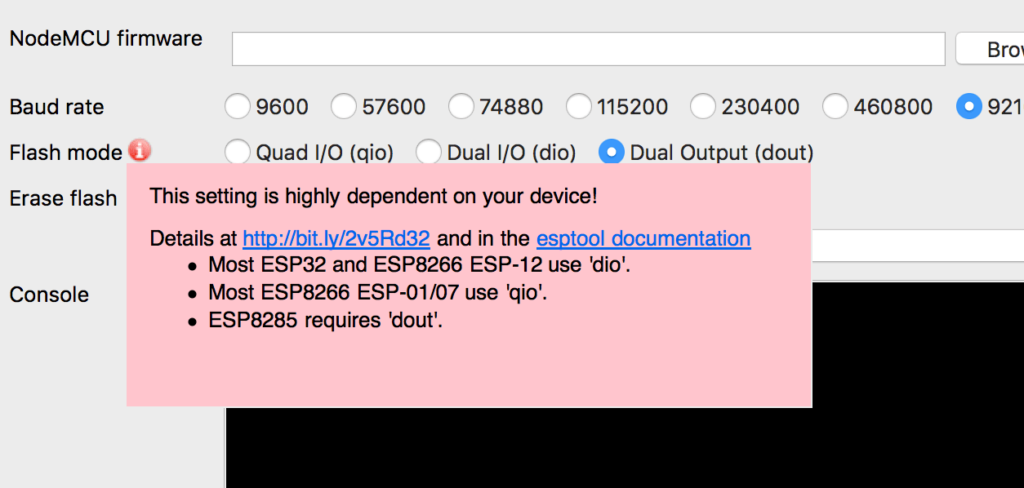
To trigger the tooltip I eventually settled for a motion event on an icon. Thus, if you hover over the icon with mouse the tooltip is displayed. To later close it you need to put the focus back on the main GUI (i.e. click there) or press ESC.
Here’s the snippet that defines the icon and its event handler. Note how the the motion handler triggers the tooltip window (win.Popup()):
def on_info_click(event):
    from HtmlPopupTransientWindow import HtmlPopupTransientWindow
    win = HtmlPopupTransientWindow(self, wx.SIMPLE_BORDER, __flash_help__, "#FFB6C1", (410, 140))

    image = event.GetEventObject()
    image_position = image.ClientToScreen((0, 0))
    image_size = image.GetSize()
    win.Position(image_position, (0, image_size[1]))

    win.Popup()

icon = wx.StaticBitmap(panel, wx.ID_ANY, images.Info.GetBitmap())
icon.Bind(wx.EVT_MOTION,on_info_click)

flashmode_label_boxsizer = wx.BoxSizer(wx.HORIZONTAL)
flashmode_label_boxsizer.Add(flashmode_label, 1, wx.EXPAND)
flashmode_label_boxsizer.AddStretchSpacer(0)
flashmode_label_boxsizer.Add(icon, 0, wx.ALIGN_RIGHT, 20)
Result
Both pieces combined will get you something like this.

Finally, to see the complete code to create an info icon with wxPython please take a look at this commit: https://github.com/marcelstoer/nodemcu-pyflasher/commit/0116a91e5332b5956dd766e64e6839fcbd64399b