Intro
 There are a number of tutorials out there on the Internet that tell you how to do Sencha Touch native packaging for iOS. The subject is also covered pretty well in the Sencha Touch docs. The problem I have with all those resources: they’re either outdated, outright wrong or stop half-way.
I don’t need a tutorial whose title claims to describe how to create an .ipa file and then simply describes how to produce an .app file – something that’s much better explained in the Sencha docs. Also, those tutorials that tell you how to produce a binary for your own single device stop half-way. Why? Because I expect you usually want to have a more or less convenient setup for all your own and your beta-testers devices, don’t you?
So, let’s cut to the chase. I’ll show you how, based on a regular Sencha Touch project, you can:
- create an iOS binary
- use an Apple provision profile for all test devices
- wrap that into an .ipa package which can then be
- upload to your website which does
- provide a convenient download link
- automate the whole process
Hint: it’s easier to build an iOS binary on a Mac!
Setup
Given is a standard Sencha Touch project that was created e.g. using the Sencha Cmd tool. Note that if you’re using Sencha’s rapid prototyping tool Sencha Architect things may be different. See the Sencha docs for details but essentially what you need to do:
- download and install Sencha Cmd
- download Sencha Touch and unpack it somewhere on your machine
- open the console
- change to the Sencha Touch directory (see 2.)
- run
sencha generate app <app-name> <path-where-to-store-generated-app>
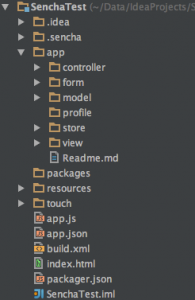
You get a directory structure like this
Apple prerequisites
First and foremost, you need to be a member of the iOS Developer Program ($99/y)!
Once you signed up you should carefully read the Sencha docs on native provisioning. Take your time, it can be quite confusing and be prepared to also read some of the Apple docs that are referenced in the Sencha docs.
What you need to not only test the app on your own device but on those of your beta-testers is a so called ad hoc provisioning profile. It’s a container for
- the app ID
- the list of registered device UDIDs (up to 100)
- the iOS Distribution certificate
The three items listed above are the ingredients you need to create a distribution profile. As I said, go through the docs referenced above and you’ll get there.
Before you proceed you need to make sure you have an <app-name>.mobileprovision file in the Sencha project folder and the distribution certificate in your OS X key chain.
Sencha config
When Sencha Cmd created your initial project it included a file called packager.json. In contains all the configuration parameters for the native build. In version 2.3 of the docs there’s now a nice overview of which parameter is used for which platform. Some are only for iOS others are only for Android and some are shared. Eventhough some values are shared I prefer to keep one file for each platform (packager-ios.json, packager-android.json).
Despite the good documentation there are three things I’d like to point out based on my current iOS packager config:
{
  "applicationName": "SenchaTest",
  "applicationId": "com.senchatestapp.SenchaTest",
  "bundleSeedId": "some-Apple-ID",
  "versionString": "1.0",
  /* iOS icon docs: http://goo.gl/yTIsa8 */
  "icon": {
    "57": "resources/icons/iOS/Icon.png",
    "114": "resources/icons/iOS/Icon@2x.png",
    "29": "resources/icons/iOS/Icon-Small.png",
    "58": "resources/icons/iOS/Icon-Small@2x.png",
    "40": "resources/icons/iOS/Icon-40.png",
    "80": "resources/icons/iOS/Icon-40@2x.png",
    "50": "resources/icons/iOS/Icon-Small-50.png",
    "100": "resources/icons/iOS/Icon-Small-50@2x.png",
    "60": "resources/icons/iOS/Icon-60.png",
    "120": "resources/icons/iOS/Icon-60@2x.png",
    "72": "resources/icons/iOS/Icon-72.png",
    "144": "resources/icons/iOS/Icon-72@2x.png",
    "76": "resources/icons/iOS/Icon-76.png",
    "152": "resources/icons/iOS/Icon-76@2x.png"
  },
  "inputPath": "./",
  "outputPath": "../dist/Payload",
  "configuration": "Release",
  "platform": "iOS",
  "deviceType": "Universal",
  "certificateAlias": "iPhone Distribution: my name (some-Apple-ID)",
  "provisionProfile": "SenchaTest.mobileprovision",
  "orientations": [
    "portrait",
    "landscapeLeft",
    "landscapeRight",
    "portraitUpsideDown"
  ]
}"icon"If you us an app-icon-generator service such as makeappicon.com you get a specific icon for each device/resolution combination. Thanks to iOS 7 we just got a bunch of additional icon sizes that an app is expected to support. You see that I listed an icon for each of the currently supported dimensions. However, Sencha native build currently only considers 57/114 & 72/144. I already reported that.
"outputPath"You’ll get an explanation for the potentially odd-looking path in the next chapter.
"configuration"Contrary to what the current Sencha documentation says the value has to be Release instead of Debug for ad hoc distributions. That’s a bug in the docs that I reported.
From .app to .ipa
At this point you should be able to run sencha app package build packager-ios.json on the console in the project’s root directory. This produces a folder called <app-name>.app in the defined output folder (see packager.json). In the OS X Finder this appears as a single file but you can peek at the content by right-clicking it and selecting ‘Show Package Contents’. 
Now you may hook your iOS device up to your Mac, start iTunes, and drag the .app file from Finder to the device in iTunes. Next time the device is synced the app is installed. That may be good enough for yourself – for the first installation. For anything else that’s too cumbersome.
So, the next step is to package the .app file into an .ipa file (if not obvious see next chapter why). Since an .ipa is nothing more than a ZIP file with a different file ending that’s fairly easy. However, the .app in the .ipa has to reside in a /Payload subfolder. Remember the configuration of my output folder in the packager.json? Simply zip the entire /Payload folder to file called <app-name>.ipa and you’re nearly home free…
Wireless ad hoc distribution
Getting your latest and greatest version out to the beta testers and all your own devices is important. It should be a hassle-free one-click experience for those installing your app. Enter, wireless ad hoc distribution. I’m going to show you how to build a web page with a hyperlink which when clicked in an iOS Safari browser downloads and installs the app on the device.
The recipe:
- an HTML page
- the
.ipafile from the previous step - an Apple
.plistfile
First, upload the .ipa to a web server. You may want to include the version in the file name.
Second, use the below .plist template, adjust the values, and save it as <app-name><version>.plist. Upload it to the same folder on the web server as the .ipa file.
<?xml version="1.0" encoding="UTF-8"?>
<!DOCTYPE plist PUBLIC "-//Apple//DTD PLIST 1.0//EN" "http://www.apple.com/DTDs/PropertyList-1.0.dtd">
<plist version="1.0">
<dict>
  <key>items</key>
  <array>
    <dict>
      <key>assets</key>
      <array>
        <dict>
          <key>kind</key>
          <string>software-package</string>
          <key>url</key>
          <string>http://www.senchatest.com/adhoc/SenchaTest1.0.ipa</string>
        </dict>
      </array>
      <key>metadata</key>
      <dict>
        <key>bundle-identifier</key>
        <string>com.senchatest.SenchaTest</string>
        <key>bundle-version</key>
        <string>1.0</string>
        <key>kind</key>
        <string>software</string>
        <key>title</key>
        <string>SenchaTest</string>
      </dict>
    </dict>
  </array>
</dict>
</plist>
Note that the string on line 14 needs to be the fully qualified URL to the .ipa to download! The string on line 26 is the name of app as it will be labeled on the iOS home screen.
Third, use the below HTML template, adjust the value of the hyperlink URL and save it on the web server, too.
<html> <head> <meta http-equiv="Content-Type" content="text/html; charset=utf-8"> <title>SenchaTest</title> </head> <body> <h2>Versions</h2> <ul> <li><a href="itms-services://?action=download-manifest&url=http://www.senchatest.com/adhoc/SenchaTest1.0.plist">SenchaTest 1.0</a></li> </ul> </body> </html>
Again, the URL on line 9 must be fully qualified
Tip I: read the Apple documentation on wireless distribution if you get stuck.
Tip II: if you want to outsource app distribution and get a boatload full of cool extra features I recommend you give TestFlight a try.
Scripting everything
Puhh, lots can go wrong in the numerous steps it takes to get here. And if it can it probably will, sorry. The good thing though is that once all the configuration is in place it’s easy to run the whole process over and over again. However, as everything that’s repetitive and mechanical it should be done by machines rather than by humans.
So, in theory all you need is a script that triggers the Sencha Touch native packaging for iOS and uploads the produces artifact to the web server. Shortcomings of Sencha Cmd, however, require that a few extra steps should be built into the script. See, by default Sencha Cmd includes everything in your project folder in the final binary – even superfluous artifacts. Entire Git repository in the .git folder? Packaged into the .app. The build folder containing local Sencha app builds? Packaged into the .app. Your IDE’s project config files? Also packaged into the .app. If this wasn’t addressed your native package would contain 70-90% waste.
So, in practice the script first copies all relevant files and folders to a temporary build folder. Sencha Touch native packaging for iOS is then triggered from there.
#!/bin/sh
BUILD_DIR=/tmp/SenchaTest
ARTIFACTS_DIR=$BUILD_DIR/artifacts
DIST_DIR=$BUILD_DIR/dist
IPA_FILE=SenchaTest1.0.ipa

echo Clearing build dir $BUILD_DIR...
rm -fr $BUILD_DIR

echo Creating artifacts dir $ARTIFACTS_DIR...
mkdir -p $ARTIFACTS_DIR
mkdir -p $ARTIFACTS_DIR/.sencha

echo Copying content of current dir to artifacts dir...
cp -R * $ARTIFACTS_DIR
cp -R .sencha/* $ARTIFACTS_DIR/.sencha

echo Changing into artifacts dir...
cd $ARTIFACTS_DIR

echo Invoking Sencha native build in current directory...
sencha app package build packager-ios.json

echo Changing into dist dir...
cd $DIST_DIR

echo Wrapping newly built .app into .ipa...
zip -r -q $IPA_FILE zipfile Payload

echo Uploading .ipa to FTP server...
curl -T $IPA_FILE -u user:password --ftp-ssl -k ftp://www.senchatest.com/public_html/adhoc/

echo Done.
Save this file as deploy-ad-hoc.sh or so in the root of the Sencha project, add execute permissions, and run it from there. There’s help creating shell scripts, too.
Conclusion: Sencha Touch native packaging for iOS done right!
I hope I could prove to you that it is possible to do Sencha Touch native packaging for iOS right. It took me a few hours but will save me countless hours in the future. It works quite well for me.
At the moment I only see one improvement that bugs me enough that I’ll address it sooner or later. The version is currently hard coded into two configuration files (packager.json, .plist) plus the HTML page and the deploy script. Furthermore, whenever I switch to a new version I need to upload the .plist to the server manually.
P.S. after I was done I discovered http://gknops.github.io/adHocGenerate/ which offers pretty good guidelines, too.
Thanks for your article, it is very good. But the only thing that I don’t get is how you add 76, 120, 150 icons into your .app cause it is not working for me so I need to add the icons to plist and then Application Uploader reject the app because the code signature is wrong. Is there a way to add icons to the .app using command?
Thanks for your time.
Edilio
“Thanks for your article, it is very good.” – you’re welcome, Good to see it’s useful for you.
“the only thing that I don’t get is how you add 76, 120, 150 icons into your .app” – Sencha Cmd does not yet support that. Please see my Sencha Config -> icons paragraph.
Really good ! Very helpful !
But there is one problem. In the script, looks like you are copying everything from current (project) directory to ARTIFACTS directory.
echo Copying content of current dir to artifacts dir…
cp -R * $ARTIFACTS_DIR
So .app file has same size. Just zip command reducing its size finally into .ipa file.
Also I am not getting how DIST_DIR is getting all stuff in temp build location despite your packager json has outputPath is set to ../dist/Payload directory
No, it works just fine (for my needs) because
cp -R *does not pick up hidden files (cp -R .*would). Hence, my.gitfolder for example does not end up in$ARTIFACTS_DIR.That’s because there’s
cd $ARTIFACTS_DIRbefore the Sencha build is triggered. Ok, the message “Invoking Sencha native build in current directory” may be a bit misleading. It’s not the current dir from where the script is run but the current dir to whichcd $ARTIFACTS_DIRhas just changed.Hi!
Great article. Did you know if they fix the iOS7 issue problem?
I have no idea. Maybe the new Sencha Cmd 4 fixes this, doubt it though.