![]() Just the other day I was finally fed up with managing a website with FTP and switched to website hosting with Git. In hindsight I don’t understand why haven’t done this transition a long time ago. It is so much more convenient and setting it up is really just a matter of minutes. This article will guide you through the setup process; come along.
Just the other day I was finally fed up with managing a website with FTP and switched to website hosting with Git. In hindsight I don’t understand why haven’t done this transition a long time ago. It is so much more convenient and setting it up is really just a matter of minutes. This article will guide you through the setup process; come along.
I have been running a free online service to build NodeMCU firmware images since summer 2015. It is a plain site built with PHP and web assets; nothing fancy but solidly hand woven. I would edit artifacts on my notebook, test them against a locally running Apache webserver and then manually upload the changed artifacts to the internet over FTP. That is a tedious and error prone process with too many manual steps involved. AND it is missing an integrated history of all the changes made to the site. No chance to quickly figure out what I changed last week. Super cumbersome to revert to a previous version. And so on.
Putting my website under Git control promises to be the remedy for all of that.
Website hosting with Git
I do not run my own server on the internet. Instead I have a shared hosting account with a leading Swiss provider that costs just a couple of bucks every month. For website hosting with Git there are only two essential prerequisites.
- You should have SSH access to the web host.
- Git must be installed both on your web host and on your local machine. If it is not installed already on the web host it is unlikely the hosting provider has granted you permission to install it yourself.
If the above is given you will be creating a Git repository on the web host in a safe place and clone it to your local machine. Once you can push changes from your machine to the remote host we will configure the automatic deployment of new revisions.
A word about GitHub
GitHub is a fantastic service and I have been actively using it for many years. If you don’t mind putting your website code into a public repository or if you are willing to pay for private repositories then their GitHub Pages is an excellent alternative to self-hosting.
Git server over SSH
Before we create Git repository(s) we need to make sure you can connect to the web host over SSH without punching in your password all the time. This step is optional of course. However, as you do not have to sacrifice security for convenience here I highly recommend you do this.
Setting up passwordless SSH access
Since you have come along this far I just assume you know how to deal with SSH. This implies you also have a public/private key pair stored somewhere. If not please generate this first.
Grab the content of your public(!) key.
$ cat ~/.ssh/id_rsa.pub
Log in to the web host and add your public key to the list of known i.e. trusted i.e. authorized keys.
$ ssh user@host.com
$ vi .ssh/authorized_keys
If you now terminate the SSH session and open a new one the host should no longer ask you for your password. It should allow you to connect because you present a public key it knows and trusts.
Create remote Git repository
On the web host you might have a ~/www or similar directory where all websites are stored. It is likely the only directory which is accessible over HTTP. For security reasons I do not recommend to put the Git repository somewhere inside this folder but alongside it.
We will be creating an empty repository in your home directory under ~/repos/example.git
$ ssh user@host.com
$ mkdir repos
$ cd repos
$ mkdir example.git
$ cd example.git
$ git --bare init
The Git repository you just created above is empty – ready to manage your website artifacts.
Clone and init local repository
Open the terminal and navigate to the local folder where you want to keep the working copy of the website.
$ git clone ssh://user@host/~/repos/example.git
$ cd example
$ touch README
$ git add README
$ git commit -m "Init"
$ git push origin master
At this point you should have been able to push changes, your first commit, to the remote host without entering a password.
Preliminary result
This concludes part 1 of this “website hosting with Git” tutorial. What we have achieved so far:
- Access your web host securely over SSH without entering the password every time.
- Run your own private Git repository/server on the web host.
- A local working copy of this repository from which you can easily and securely push changes to the remote repository.
However, your website is not yet publicly available as the remote Git repository is stored in a folder not served over HTTP. Even if, a peek inside the example.git folder on the web host you will tell you that its structure doesn’t look anything like the website you pushed to it. It is a bare repository where Git manages your artifacts in its way. Don’t worry, all is well.
Automatic deployment from Git repository
Ultimately you will want to push a change from your local repository to the web host and see it applied near instantly. You have a couple of options; some more elegant and practical, others rather not.
Using CRON
For the sake of completeness I mention CRON – being one of those impractical solutions. You would clone the repository on the web host into a publicly available folder and have a CRON job do a git pull at regular intervals. Most of the time that job would run and do nothing. If it ran once a minute and you updated the website once per week, 99.99007937% of all its executions would be a waste.
Enter, Git hooks
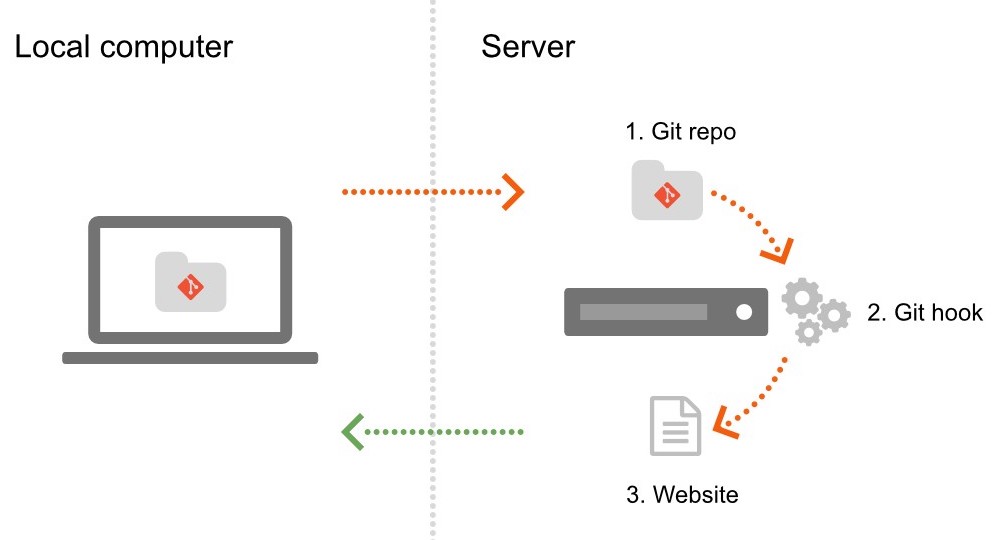
Git can trigger actions for many repository events through event hooks; so called Git hooks. A hook is an (executable) script with a defined name stored in a defined location. The script can contain arbitrary actions. This makes Git hooks an extremely powerful and versatile tool.
What we need is a hook that fires after the remote repository on the web host has finished receiving updates from your local repository. Tada, it is called post-receive – makes sense, doesn’t it.
First we clone the remote repository into a folder on the web host that serves your website, something like ~/www/example (where example.com would be served from)
$ cd www
$ git clone ~/repos/example.git
Now we create a Git hook which updates that cloned repository to the latest version of the “remote” (i.e. master) repository.
$ cd ~/repos/example.git
$ cd .git/hooks
$ touch post-receive
$ chmod +x post-receive
$ vi post-receive
Paste the following code into that file and save it.
#!/usr/bin/env bash

cd /home/user/www/example

# https://stackoverflow.com/a/4100577/131929
unset GIT_DIR
git fetch
git reset --hard origin/master
In many cases a git pull instead of fetch and reset would suffice. Adjust it to your needs.
A note on GIT_WORK_TREE
There is an alternative to creating this cloned repository and then updating in via Git hook. You could simple tell the repository through the hook that its “working tree” were in that publicly available folder, /home/user/www/example in our case, and checkout the latest revision into it. The three commands in the hook script would be replaced with something like this:
GIT_WORK_TREE=/home/user/www/example git checkout -f
This may seem elegant but I find it impractical for anything but tiny repositories or low-traffic sites. Why? Your website will be in an inconsistent state until the git checkout command has completed. For sites with e.g. lots of images this can take up to a few dozen seconds.
Conclusion and wrap-up
Judging by the length of this article you might think that hosting a website with Git be complicated to set up. Yet, if you stripped away all my comments, extras and alternatives I mentioned the tasks become few and the whole process very straightforward. To prove I condensed all commands into a simple Gist.
- Create remote repository
- Create local clone on development machine
- Clone repository on web host into website folder
- Create a Git
post-receivehook
That’s all, short and sweet.